Sunday 30 November 2014

Disney Series: Princess Anna - Frozen Makeup Tutorial

Hello my lovelies, I hope you're all well and are ready for...

CHRISTMAS! THE SNOWS COMING DOWN, CHRISTMAS *sings to oneself* 

I'm not completely ready, as I still have loads of gifts to buy and put up my Christmas tree and decorate my room for Christmas which will be uploaded to my blog you guys, so stay tuned for that! 

But, I've decided that each month for the next year I am going to post looks inspired by Disney Princess's and anyone else who I love from animated Disney films. I'm starting this in December because Frozen is all about ice and snow which is what December usually is. But, because I'm starting with Frozen, I am going to work backwards - from new to old (from Frozen all the way back to Snow White). But I'm really looking forward to doing all these makeup looks for you guys and I hope you enjoy these. But if you want to know how to become Princess Anna, then please keep on reading. 


Step 1: 


Firstly apply your face base. Now, because we're recreating Disney Princess looks, they're skin is always flawless and blemish free. So to make your skin completely flawless start off with a primer/moisturiser and then apply concealer on the areas you really want to cover. I am using my Rimmel London's Wake Me Up concealer in Ivory and I applied it around my nose, my apples of my cheeks, down my nose, and on my chin. I blended my concealer in with a beauty blender because sponges in my opinion work better than brushes. 

On top of this I applied my foundation. I am using Rimmel London's Lasting Finish in Nude 24 Hours. I just applied this all over my face and really blended it in with my beauty blender. 

You don't have to do this next step, but I needed to. I went under my eyes with a mix of my concealer and my foundation because my concealer is too dark compared to the nude foundation. So I just blended them together on my hand and applied it all underneath and around my eye area. 

Step 2: 


Next, apply your powder to set this all in place. 

Step 3: 


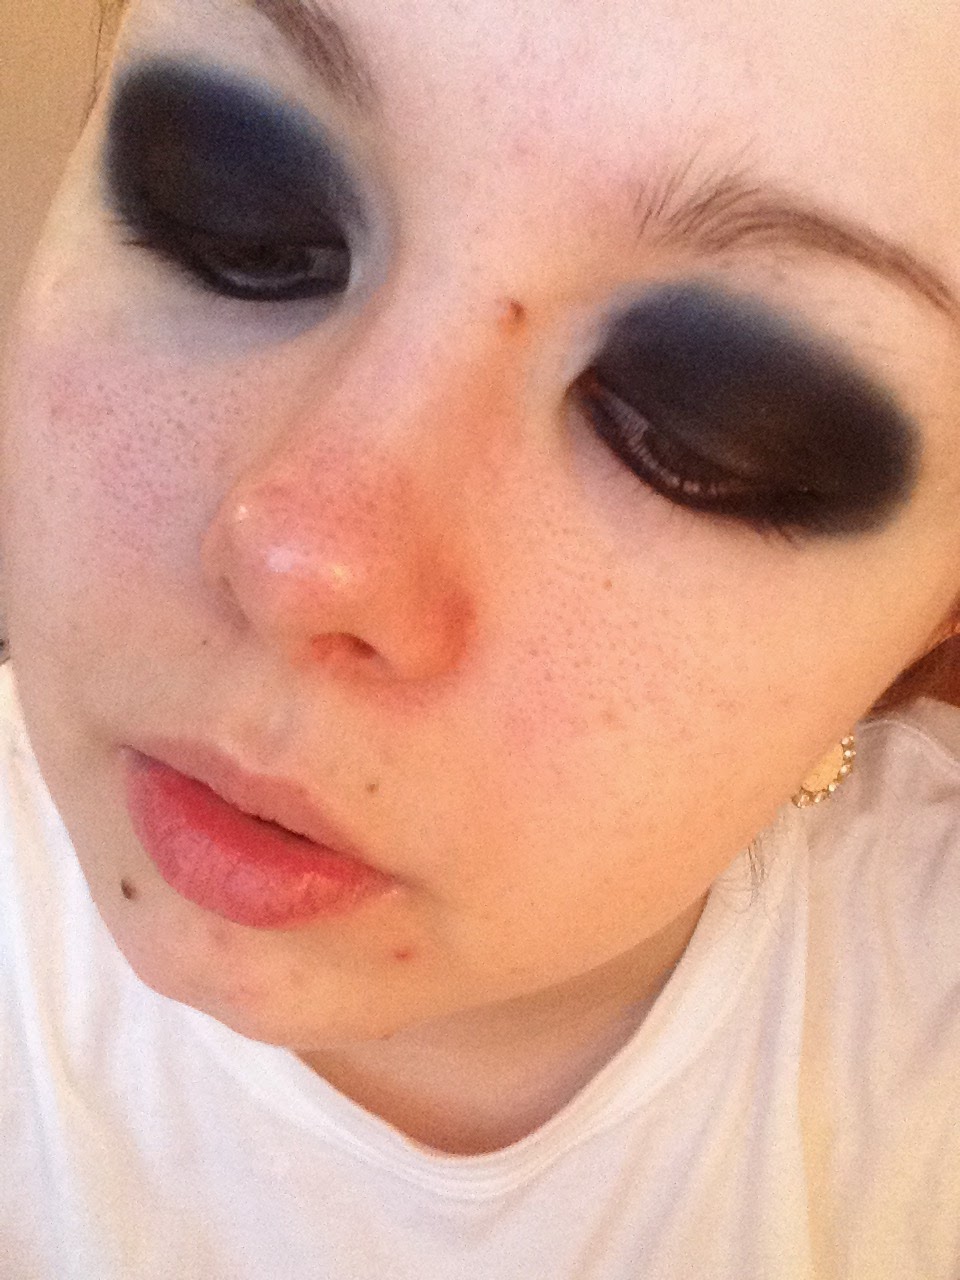
These two images maybe a little bit strange, but, it is important to line your tight line and water line around your eyes for a Disney Princess inspired look. The reason for this is because, especially in Frozen; Anna and Elsa have gorgeous full and thick lashes at the roots. 

All you have to do is gently lift up your eyelid and draw on the line of your eyelash roots. Then you do the same for your lower lashline. 

Step 3: 


Fill in your eyebrows. 

Step 4: 


For this look I didn't have to do my eye shadow first because I only applied one colour and it was a shimmery light white shade because Anna has no eyeshadow on her lids. Then, I just applied my mascara. 

Step 5: 


For Princess Anna, it is all about the rosy cheeks and I really packed on my blush for this one and mainly focused the colour on the apples of my cheeks. 

Step 6: 


As both Anna and Elsa have very neutral lips, I applied a natural skin coloured red lipgloss from Colour Couture. 

Step 7: 


Then this is the finished look! In true style, you could completely be Anna you could keep plaits in your hair. But I wanted my daily wavy hair. But I am happy with how this turned out and I hope you all like it! 


Thank you all very much for reading and next I will be posting an Elsa makeup tutorial to go along with this one! 

Bye for now, 

Katie 
xoxoxoxo

Saturday 22 November 2014

Seasonal Series: Starry Night Sky Makeup Tutorial


Hello my lovelies! I hope you're all well and this is my second post in the seasonal series I am doing! (woohoo!) I've been a little bad recently on makeup tutorials, so I thought it was time I posted one! This one is one I've really been looking forward to because dark nights and starry skies are one of my favourite things. I love space and I've always wanted a telescope to look at the stars more clearly but I have never had one. But one day, I am definitely going to buy one! But this look is super easy to do and anyone can do this; you can wear this to a party if not everyday which is one of the great things about it. So, if you want to know how shine just like a starry night sky, then please keep on reading.

 (PS, I have not cropped any of these pictures because I couldn't be bothered) 

Step 1: 


Apply a black glittery eyeshadow all over the lid on a flat eyeshadow brush. Also apply it into the crease and just above. Make sure you round it on the outer corners. 

Remember do not apply any foundation base etc as we're using black eyeshadow and it is most likely to get fall out on your skin.

Step 2:


Next, taking the same brush and black glitter shade; run the colour all the way along the lower lashline and connect it to the lid shade (where the outer corner is). 

Step 3: 


Now, taking a dark navy blue on a blending brush; apply it on the lid where the black finishes and blend it all over the lid. 

But because we want a rounded outer corner, we're blending out the edge in a 'U' shape (as you can see above). I also decided to blend it slightly on my under eye where the shades meet (just under the outer corner on the lower lashline) 


Step 4: 


At this point you should have something like this. 


Step 5: 


Now this step is optional, but because my black glittery eyeshadow wasn't glittery enough for my liking of a 'starry' sky. I added some iridescent glitter to my eyelids. 

So what I did first was take my black eyeshadow glitter shade and packed that on with my ring finger for more glitter pay off. But, it wasn't enough. So all I did was wet my eyeshadow brush slightly and picked up the glitter on the brush and gently placed it onto my lids. Now, because I have no glitter adhesive they are just sat on my eyelid which means they will eventually fall off. But I applied these earlier this afternoon and it is now 18:15/6:15pm and they're still on. If you have glitter glue then I would suggest using that but if you don't, just do what I did. 

Step 6: 


Once you've applied enough glitter to your liking this is what you should end up with. 

Step 7: 


Then apply a natural coloured lipgloss/ lipstick as we want all the attraction on the eyes. 

Step 8: 


Apply your mascara and I also applied a kohl eyeliner pencil in the waterline because I didn't want any shade but black coming through. 

Then just apply your base as normal and you're finished! 

I really love this look because it really brings out my eyes and makes them look bluer; they appear much lighter with dark colours on the eyes. Plus I think the navy blend is lovely and this would look great to wear on a night out. 


Thank you very much for reading everyone and I hope you enjoyed! I also would like to ask you, to leave me comments below on anything you would like me to post as I'd like to take your suggestions. 

Bye for now and I'll talk to you soon! 

Katie 
xoxoxoxo

Sunday 16 November 2014

1 Year Anniversary to Jess, Heather, and I!

Hello everyone, I hope you're all well! Now, you maybe wondering what this post is going on about, well Jess, Heather, and I have officially been best friends for a year! Now, you may wonder why this means so much to me? These two girls mean the absolute world to me because the way we became best friends through college happened so fast as it took me a little while to fall into place and I finally found my place after just letting life take over and it slotted me with Heather and Jess. 

This was our first ever group photo at our college Christmas party just after we'd become good friends and ever since then we've gone from strength to strength. No one truly knows how much I appreciate them for letting me join their twosome to become a threesome because I was kind of lost at college just after October and I didn't know who my true friends were until I met these guys. 


Our first group photo together (Jess, Me, then Heather)
Sometimes I just kind pinch myself because I love them both so much and I really do not know what I would do without them in my life now. It feels like we've been friends all our lives and it's only been a year. It also sometimes doesn't feel real knowing that we're so close and yet we're completely opposites which is what I think makes us such good friends because we learn from one another as well as love and support one another dearly. 


We've had a lot of memories together from last year and throughout this year we're bound to have even more. But for now, let's have a look at some more memories of the last year together.
Jess and I on our last day as first years
Heather, Jess, and I near the end of our
first college year.
Heather and I at last year's
Christmas party 
Jess and I at last year's
Christmas party
Heather and I at last year's
Christmas party
Summer days
Jess and I during the directing festival 

Here is how we celebrated our one year anniversary. 


Costa date 
Costa date
Costa date
Our table at Sweet Tooth 
For our main celebration we went and had lunch last Wednesday at Sweet Tooth which is a cute little pancake shop which serves pancakes, crepes - sweet and savoury, waffles, soft drinks, and hot beverages etc. Heather had American pancakes with bacon and maple syrup, Jess had apple and cinnamon crepe, and I had a waffle with chocolate sauce, ice cream, and this gorgeous cream on the side. 


All of these images of the mug of chocolate is what Heather ordered. Now, it says hot chocolate but it was a pure mug of melted chocolate that came with cream and marshmallows. Either way it was really nice but extremely sickly. 


Here is what Sweet Tooth looks like from the inside, it is the most adorable little cafe and us three desperately want to go back there soon. 


Here is what I had for lunch - waffle with chocolate sauce, chocolate ice cream, and normal cream. It was absolutely delicious and I wanna have it again! Even though I'd love to try everything on their menu. 


Everyone, I could talk about Jess and Heather all day but the main thing you need to know is how much I care, and love, and support them 100%. I would also really like if you guys loved them as much as me as I hope in the future they're gonna be in future posts - such as Heather's birthday as we're gonna do some follow us around video's hopefully. 

But for now, thank you so much for reading this! and I will talk to you all again very soon!

Bye for now, 

Katie 
xoxoxox

Monday 10 November 2014

Follow Me Around Wyevale Garden Centre - Christmas Style!


Hello everyone, I hope you're all well and have had a good start to the week. Now, this is a very exciting post because it is my first Christmas post of the year!!! *scream excitedly and does happy dance*. Now, if you guys didn't know already, I absolutely adore Christmas. I think winter is the nicest time of year, Christmas is the best holiday of the year because it's all about friends and family. Especially with gift giving because I love giving people Christmas gifts as it's nice to treat people. For me it's not all about the presents for myself, I just love how festive all the shops get, putting up the Christmas tree, singing Christmas songs, the lights, and all of the food! 

So, with all that in mind, as you can guess this is going to be a massive Christmas overload over a month early, but do I care? No! As, it's officially the holiday season now in England because the Cola advert was played last night. If you're British, you know that means Christmas is coming. (I'm not sure about the rest of you). But in this post is just going to be loads of photo's of all the pretty things in the garden centre to do with Christmas, so if you want to see all the gorgeous Christmas things, please keep reading. 


These reindeer were so cool because their heads actually moved and I really wanted to take them home with me.

This camel was here last year as well as this year, and he was all apart of the nativity section which was so cute. 
This walk way was so pretty! 
These snow globes were awesome. They light up underneath as you can see and they have glitter inside and you shake it to get it going and then it will freeze. All the glitter will just stop moving and then it has this jet in the bottom which starts up after it's frozen for a while and then spins really fast to make all the glitter bounce around. I really want one! 
In the shop they had these glasses where if you looked through them, any Christmas light would become a snowflake - which you can see in this photo above.
This guy became my best friend! I absolutely love polar bears. I'd have one as a pet if I could. But he was massive and extremely soft to cuddle! 
Pretty tree made of lights. 


Cute little Christmas village ornaments. 


I love candles, even if they are fake.
I fell in love with this dress. It's absolutely gorgeous. It reminds me of a wedding dress and could be a snow queen dress. 
These are for Yankee Candles to sit in and obviously they are for the Christmas candles. My favourite two are Snowflake Cookie and Christmas Cookie - desperately want one. But they had tones of these in different sizes and designs, e.g. reindeer's and snowflakes.  
Just a cute little reindeer. 
I felt like it looked like frost, therefore, there had to be a photo of it!!!!
These were some Yankee Candle Christmas burner melts that I thought were so lovely and festive. 
This section reminded me of the John Lewis advert for Christmas this year which melts my heart every time I see it. 
These are the lights they have outside on all of the trees that are so pretty! They look even better at night time as I saw them last year when I went to the garden centre at Christmas. 
I want to buy all of these accessories that are in this picture. I just love the walk way feathers and roses, and then the tree with roses on, birds, white tinsel, silver and pink baubles. Basically all of this is just me in a picture, I love it, I want to buy it all!


Now, these had to be my favourite item in the shop because, A: I love polar bears, and B: the one laid on the floor moves. He was the most adorable thing and was extremely soft and had snow all over him (image on the left). But the other two I loved too even though they didn't move, the baby one is the most adorable thing ever (image on the right). 


Everyone, that is my Christmas follow me around post done. I think I am going to do some more follow me around posts, I'm not sure where but I know I am going to Milton Keynes soon to do some Christmas shopping, so maybe then. Also, on Heather's birthday we're going to do a follow us around video/post because it's her birthday! 

But thank you all so much for reading, I hope you enjoyed my first Christmas post as guys, there will definitely be more to come! Are you excited for that?... I am! 

Talk to you all soon and bye for now! 

Katie 
xoxoxo